After creating your form, the next step is adding it to your website.
Ray’s Contact Form makes this easy using a shortcode.
This guide explains how to:
- Add a form to a page or post
- Use the shortcode properly
- Embed forms in widgets
- Use forms in page builders
What Is a Shortcode?
A shortcode is a small piece of text that tells WordPress to display something dynamic.
Example:
[rayscontact id=”123″]
When WordPress sees this shortcode, it replaces it with your form.
Each form has a unique ID.
Finding Your Form Shortcode
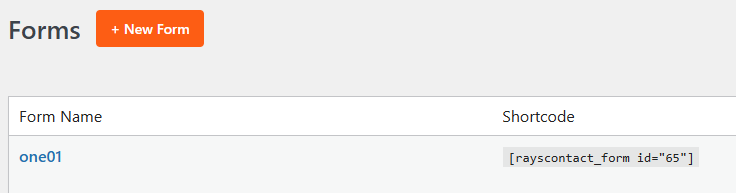
To find your form’s shortcode:
- Go to Ray’s Contact Form → Forms.
- Locate the form you want to publish.
- Copy the shortcode displayed next to it.
Example:
[rayscontact id=”5″]
You are now ready to embed it.
Adding a Form to a Page (Block Editor)
If you are using the WordPress Block Editor:
Method 1: Using a Shortcode Block
- Go to Pages → Add New (or edit an existing page).
- Click the + button to add a block.
- Search for Shortcode.
- Add the Shortcode block.
- Paste your shortcode inside it.
- Click Publish or Update.
Your form will now appear on that page.
Adding a Form to a Page (Classic Editor)
If you are using the Classic Editor:
- Open the page where you want the form.
- Paste the shortcode directly into the content area.
- Click Publish or Update.
That’s it.
Adding a Form to a Post
The process is identical to adding it to a page:
- Go to Posts → Add New.
- Insert the shortcode.
- Publish the post.
Forms can be embedded anywhere shortcodes are supported.
Embedding in Widgets
You can also place forms in widget areas such as:
- Sidebar
- Footer
- Header widget areas
Steps:
- Go to Appearance → Widgets.
- Add a Shortcode widget (or Text widget).
- Paste the form shortcode.
- Click Save.
The form will now appear in that widget area.
Using Forms with Page Builders
Ray’s Contact Form works with most page builders.
If you use builders such as:
- Elementor
- Beaver Builder
- WPBakery
- Divi
You can add the form using:
- A Shortcode element
- A Text/HTML element
Simply paste the shortcode into the element and update the page.
Embedding Multiple Forms
You can embed multiple forms on the same page.
Example:
[rayscontact id=”1″]
[rayscontact id=”2″]
Each shortcode displays a different form.
Make sure each form serves a clear purpose to avoid confusion.
Styling and Layout Considerations
The form’s appearance depends on:
- The selected Theme
- Form Width settings
- Your website’s layout
Before publishing:
✔ Preview the page
✔ Check spacing
✔ Test on mobile devices
Use the Theme Preview panel inside the builder to refine styling before embedding.
Updating Embedded Forms
Once a form is embedded:
- You do not need to re-add the shortcode.
- Any changes made in the Form Builder automatically update the form everywhere it appears.
Simply edit the form and click Save Form.
All embedded instances update instantly.
Removing a Form
To remove a form from a page:
- Edit the page.
- Delete the shortcode block.
- Update the page.
The form will no longer appear.
Common Questions
Can I customize the form directly inside the page?
No.
All customization must be done in the Form Builder.
Can I duplicate a form for another page?
Yes.
Duplicate the form inside the Forms list, then embed the new shortcode.
What happens if I delete a form?
If you delete a form:
- The shortcode will no longer render the form.
- Always export submissions before deleting.
Best Practices
✔ Create and test your form before embedding
✔ Use clear page titles
✔ Keep forms relevant to page content
✔ Test submissions after publishing
✔ Use one primary form per page when possible
Example Workflow
- Create form in builder.
- Configure fields and email notifications.
- Choose theme.
- Save form.
- Copy shortcode.
- Paste into page.
- Publish.
- Test submission.
Simple and reliable.
Related Guides
You may also want to explore: